Build Link Previews with Playwright and the Popover API
Wikipedia-style link previews can make your blog feel more polished. In this tutorial, we'll build a system that captures screenshots at build time and displays them using the native Popover API with smooth CSS animations.
January 1, 2026 (6mo ago)
10 min read
You've seen them on Wikipedia - hover over a link and a preview pops up showing you what's on the other side. It's a small touch that makes the reading experience feel more intentional, helping readers decide if they want to click through without breaking their flow.
I recently reintroduced this functionality to my blog from 2022 and wanted to explain how it works. This implementation consists of two parts: a build-time script that captures screenshots of external links using Playwright, and a React component that displays them with the native Popover API and CSS animations.
The End Result
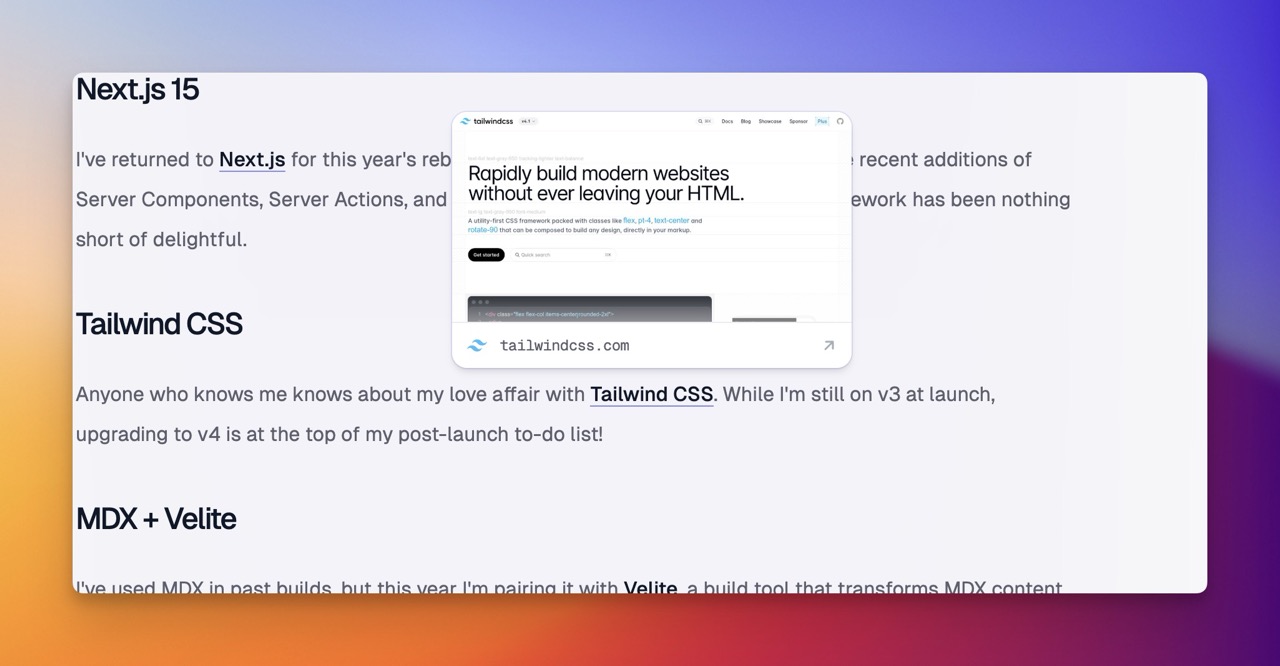
Before diving in, here's what we're building: when readers hover over an external link in my articles, a popover appears showing a screenshot of that page along with its favicon and domain. The popover animates in smoothly and stays open if you move your cursor onto it. If you're reading this on desktop, try hovering over this link to see it in action!
The key constraint is that screenshots are generated at build time, not runtime. This keeps page loads fast and avoids the complexity of serverless screenshot services.
Why Build Time?
You might wonder why we don't just capture screenshots on-demand. A few reasons:
- Performance — No waiting for screenshots to generate when users hover over links
- Reliability — Screenshots are cached as static assets, no external service dependencies
- Cost — No per-request charges from screenshot APIs
- Privacy — We're not proxying user requests through third-party services
The tradeoff is that screenshots can become stale if the target page changes. We handle this by regenerating screenshots older than 6 months.
Setting Up Playwright
First, let's install Playwright. We only need the core library, not the test runner:
npm install playwright --save-dev
Then install the Chromium browser that Playwright will use:
npx playwright install chromium
The Screenshot Generator Script
Create a script that will run during your build process. Here's the structure:
scripts/generate-link-previews.tsimport { chromium, Browser } from "playwright";
import fs from "fs/promises";
import path from "path";

const config = {
  screenshotWidth: 1200,
  screenshotHeight: 630,
  timeout: 30000,
  outputDir: "public/previews",
  manifestPath: "public/previews/manifest.json",
  imageFormat: "jpeg" as const,
  imageQuality: 80,
};
The dimensions (1200x630) match the standard Open Graph image size, which looks good at various scales.
Extracting URLs from Your Content
The script needs to find all external links in your blog posts. If you're using MDX with a content layer like Velite, you can parse the compiled output:
function extractUrlsFromCode(code: string): string[] {
  const patterns = [
    /href[=:]\\?"([^"\\]+)\\?"/g,
    /href:\s*["']([^"']+)["']/g,
    /href="([^"]+)"/g,
  ];

  const urls = new Set<string>();

  for (const pattern of patterns) {
    let match;
    while ((match = pattern.exec(code)) !== null) {
      const url = match[1];
      if (shouldGeneratePreview(url)) {
        urls.add(url);
      }
    }
  }

  return [...urls];
}
We filter URLs to only include external links, excluding social media sites (which often block automated browsers) and internal links:
const EXCLUDED_DOMAINS = [
  "twitter.com",
  "x.com",
  "facebook.com",
  "instagram.com",
  "linkedin.com",
  "youtube.com",
  "tiktok.com",
];

function shouldGeneratePreview(url: string): boolean {
  if (!url.startsWith("http")) return false;

  try {
    const parsed = new URL(url);
    return !EXCLUDED_DOMAINS.some((domain) => parsed.hostname.includes(domain));
  } catch {
    return false;
  }
}
Capturing Screenshots
The core screenshot logic handles timeouts gracefully and blocks unnecessary resources to speed things up:
async function captureScreenshot(
  browser: Browser,
  url: string
): Promise<{ success: boolean; error?: string }> {
  const context = await browser.newContext({
    viewport: {
      width: config.screenshotWidth,
      height: config.screenshotHeight,
    },
    userAgent: "Mozilla/5.0 (Macintosh; Intel Mac OS X 10_15_7)...",
  });

  const page = await context.newPage();

  try {
    // Block fonts and media to speed up loading
    await page.route("**/*", (route) => {
      const resourceType = route.request().resourceType();
      if (["font", "media", "websocket"].includes(resourceType)) {
        route.abort();
      } else {
        route.continue();
      }
    });

    // Try networkidle first, fall back to domcontentloaded
    try {
      await page.goto(url, {
        waitUntil: "networkidle",
        timeout: 20000,
      });
    } catch {
      await page.goto(url, {
        waitUntil: "domcontentloaded",
        timeout: config.timeout,
      });
      await page.waitForTimeout(3000);
    }

    await page.waitForTimeout(1000);

    const filename = `${hashUrl(url)}.jpeg`;
    await page.screenshot({
      path: path.join(config.outputDir, filename),
      type: "jpeg",
      quality: config.imageQuality,
    });

    return { success: true };
  } catch (error) {
    return {
      success: false,
      error: error instanceof Error ? error.message : "Unknown error",
    };
  } finally {
    await context.close();
  }
}
ThoughtThe fallback from
networkidletodomcontentloadedis key. Many sites never reach "networkidle" due to continuous analytics or tracking scripts. By catching that timeout and trying a faster wait strategy, we can capture screenshots from sites that would otherwise fail.
The Hash Function
We need a way to map URLs to screenshot filenames that works both at build time (Node.js) and runtime (browser). A simple hash function does the trick:
function hashUrl(url: string): string {
  let hash = 0;
  for (let i = 0; i < url.length; i++) {
    const char = url.charCodeAt(i);
    hash = (hash << 5) - hash + char;
    hash = hash & hash;
  }
  return Math.abs(hash).toString(16).padStart(12, "0").slice(0, 12);
}
This generates a 12-character hex string that's deterministic and collision-resistant enough for our purposes.
Building the Manifest
The script outputs a JSON manifest that maps URL hashes to screenshot metadata:
interface LinkPreviewManifest {
  generated: string;
  version: string;
  previews: Record<
    string,
    {
      url: string;
      screenshotPath: string;
      width: number;
      height: number;
      generatedAt: string;
      status: "success" | "failed";
      errorMessage?: string;
    }
  >;
}
This manifest is loaded by the React component to look up preview data for each link.
Optimizing Build Time
The first time you run the script, it might take a while to capture screenshots for all your external links. After that, we want builds to be fast.
Two optimizations make this work:
1. Content Hashing
We generate a hash of all your blog content. If nothing changed since the last build, skip everything:
const currentHash = generateContentHash(posts);
const storedHash = await loadContentHash();

if (storedHash === currentHash && existingManifest) {
  console.log(`✓ No content changes detected. Skipping.`);
  return;
}
2. Incremental Updates
Only capture screenshots for new URLs or ones older than 6 months:
const urlsToProcess = [...allUrls].filter((url) => {
  const hash = hashUrl(url);
  const existing = existingPreviews[hash];

  if (!existing) return true;
  if (existing.status === "failed") return false;

  const age = Date.now() - new Date(existing.generatedAt).getTime();
  return age > 6 * 30 * 24 * 60 * 60 * 1000;
});
With these optimizations, subsequent builds complete in under 10ms when nothing has changed.
The React Component
Now for the frontend. We'll use the native Popover API, which provides:
- Proper stacking context (no z-index battles)
- Keyboard accessibility (Escape to close)
- CSS-only animations with
@starting-style
The Main LinkPreview Component
app/components/LinkPreview/LinkPreview.tsx"use client";

import { useState, useRef, useCallback, useId, useEffect } from "react";
import { createPortal } from "react-dom";
import { LinkPreviewPopover } from "./LinkPreviewPopover";

interface LinkPreviewProps {
  href: string;
  children: React.ReactNode;
  preview: { screenshotPath: string; width: number; height: number } | null;
  className?: string;
}

export function LinkPreview({ href, children, preview, className }: LinkPreviewProps) {
  const [position, setPosition] = useState<{ top: number; left: number } | null>(null);
  const [isMounted, setIsMounted] = useState(false);
  const [isHoveringLink, setIsHoveringLink] = useState(false);
  const [isHoveringPopover, setIsHoveringPopover] = useState(false);
  const linkRef = useRef<HTMLAnchorElement>(null);
  const popoverRef = useRef<HTMLDivElement>(null);
  const uniqueId = useId();

  useEffect(() => {
    setIsMounted(true);
  }, []);

  // ... positioning and show/hide logic
}
The component tracks two hover states: one for the link and one for the popover. This lets users move their cursor onto the popover without it disappearing.
Positioning Logic
We calculate the popover position based on the link's bounding rect:
const calculatePosition = useCallback(() => {
  if (!linkRef.current) return null;

  const rect = linkRef.current.getBoundingClientRect();
  const viewportWidth = window.innerWidth;
  const viewportHeight = window.innerHeight;

  // Position above the link, centered
  let top = rect.top - POPOVER_HEIGHT_ESTIMATE - 12;
  let left = rect.left + rect.width / 2 - POPOVER_WIDTH / 2;

  // If not enough space above, position below
  if (top < 10) {
    top = rect.bottom + 12;
  }

  // Keep within horizontal bounds
  if (left < 10) {
    left = 10;
  } else if (left + POPOVER_WIDTH > viewportWidth - 10) {
    left = viewportWidth - POPOVER_WIDTH - 10;
  }

  return { top, left };
}, []);
Show/Hide with Delays
Small delays prevent the popover from flickering on quick mouse movements:
useEffect(() => {
  const shouldShow = isHoveringLink || isHoveringPopover;

  if (shouldShow) {
    if (hideTimeoutRef.current) {
      clearTimeout(hideTimeoutRef.current);
    }

    showTimeoutRef.current = setTimeout(() => {
      const pos = calculatePosition();
      if (pos) {
        setPosition(pos);
        popoverRef.current?.showPopover();
      }
    }, 200); // 200ms delay before showing
  } else {
    if (showTimeoutRef.current) {
      clearTimeout(showTimeoutRef.current);
    }

    hideTimeoutRef.current = setTimeout(() => {
      popoverRef.current?.hidePopover();
    }, 100); // 100ms delay before hiding
  }
}, [isHoveringLink, isHoveringPopover, calculatePosition]);
The 100ms hide delay is crucial - it gives users time to move from the link to the popover without triggering a close.
CSS Anchor Positioning (Progressive Enhancement)
Here's where it gets exciting. CSS Anchor Positioning is a new feature (Chrome 125+) that lets browsers handle popover positioning natively. Instead of calculating positions with JavaScript, the browser does it automatically:
@supports (anchor-name: --test) {
  .link-preview-popover.anchor-positioned {
    position: absolute;
    position-try-fallbacks: flip-block;

    bottom: anchor(top);
    left: anchor(center);
    transform: translateX(-50%);
    margin-bottom: 12px;
  }
}
The anchor() function references the anchor element's edges. By setting bottom: anchor(top), the popover's bottom edge aligns with the anchor's top edge, placing it above. The position-try-fallbacks: flip-block tells the browser to flip to top: anchor(bottom) when there's not enough space above - no JavaScript required for the repositioning logic.
We detect support at runtime and conditionally enable it:
function supportsAnchorPositioning(): boolean {
  if (typeof CSS === "undefined") return false;
  return CSS.supports("anchor-name", "--test");
}

// In the component:
const [supportsAnchor, setSupportsAnchor] = useState(false);

useEffect(() => {
  setSupportsAnchor(supportsAnchorPositioning());
}, []);

// Apply anchor-name to the link when supported
<a style={supportsAnchor ? { anchorName: anchorName } : undefined}>
Browsers that don't support anchor positioning fall back to our JavaScript positioning logic. This is progressive enhancement in action - users with modern browsers get a smoother experience, while everyone else still gets a working feature.
The Popover Component
The popover uses the native popover="manual" attribute and renders through a portal:
export const LinkPreviewPopover = forwardRef<
  HTMLDivElement,
  LinkPreviewPopoverProps
>(({ id, screenshotPath, url, position, onMouseEnter, onMouseLeave }, ref) => {
  return (
    <div
      ref={ref}
      id={id}
      popover="manual"
      role="tooltip"
      className="link-preview-popover"
      style={position ? { top: position.top, left: position.left } : undefined}
      onMouseEnter={onMouseEnter}
      onMouseLeave={onMouseLeave}
    >
      <div className="link-preview-card">
        <img src={screenshotPath} alt={`Preview of ${url}`} />
        <div className="link-preview-footer">
          <img src={getFaviconUrl(url)} alt="" />
          <span>{formatDisplayUrl(url)}</span>
        </div>
      </div>
    </div>
  );
});
CSS Animations with @starting-style
The native Popover API works beautifully with the new @starting-style CSS rule for entry animations:
app/globals.css.link-preview-popover {
  margin: 0;
  padding: 0;
  border: none;
  background: transparent;
  position: fixed;
  inset: unset;

  /* Animation setup */
  opacity: 0;
  transform: translateY(8px) scale(0.96);
  transition:
    opacity 0.15s ease-out,
    transform 0.15s ease-out,
    overlay 0.15s ease-out allow-discrete,
    display 0.15s ease-out allow-discrete;
}

.link-preview-popover:popover-open {
  opacity: 1;
  transform: translateY(0) scale(1);
}

@starting-style {
  .link-preview-popover:popover-open {
    opacity: 0;
    transform: translateY(8px) scale(0.96);
  }
}
The @starting-style rule defines where the animation begins. When the popover opens, it transitions from these starting values to the :popover-open state.
IdeaThe
transition-behavior: allow-discreteproperty is what makes this work. It allowsdisplayandoverlayto participate in transitions, which is necessary for the Popover API's show/hide behavior.
Respecting User Preferences
Always disable animations for users who prefer reduced motion:
@media (prefers-reduced-motion: reduce) {
  .link-preview-popover {
    transition: none;
  }

  @starting-style {
    .link-preview-popover:popover-open {
      opacity: 1;
      transform: none;
    }
  }
}
Optimizing for Touch Devices
On touch devices, hover interactions don't make sense. Rather than rendering the popover and hiding it with CSS, we skip rendering entirely:
function isTouchDevice(): boolean {
  if (typeof window === "undefined") return false;
  return window.matchMedia("(hover: none) and (pointer: coarse)").matches;
}

// In the component:
const [isTouch, setIsTouch] = useState(false);

useEffect(() => {
  setIsTouch(isTouchDevice());
}, []);

// Render simple link on touch devices
if (!preview || isTouch) {
  return (
    <a href={href} className={className} target="_blank" rel="noopener noreferrer">
      {children}
    </a>
  );
}
This approach is more efficient than CSS hiding because we avoid:
- Creating the portal and popover DOM nodes
- Attaching unnecessary event handlers
- Running positioning calculations that will never be used
The link still works perfectly - it just doesn't have the preview popover attached.
Integrating with MDX
The final piece is hooking everything up to your MDX renderer. You'll want a custom link component that fetches the manifest and looks up preview data:
function CustomLink({ href, children, ...rest }) {
  const manifest = useLinkPreviewManifest();

  // Internal or anchor links - render normally
  if (href.startsWith("/") || href.startsWith("#")) {
    return <a href={href} {...rest}>{children}</a>;
  }

  // External links - check for preview
  const preview = getPreviewFromManifest(manifest, href);

  return (
    <LinkPreview href={href} preview={preview}>
      {children}
    </LinkPreview>
  );
}
The useLinkPreviewManifest hook fetches and caches the manifest JSON:
function useLinkPreviewManifest() {
  const [manifest, setManifest] = useState(null);

  useEffect(() => {
    fetch("/previews/manifest.json")
      .then((res) => (res.ok ? res.json() : null))
      .then(setManifest)
      .catch(() => {});
  }, []);

  return manifest;
}
Wrapping Up
Link previews are one of those features that seem simple but have a lot of moving parts. Here's what we covered:
- Build-time screenshot generation with Playwright, including fallback strategies for sites that never reach "networkidle"
- Content hashing for fast incremental builds that skip work when nothing has changed
- The native Popover API for accessible, CSS-animated tooltips without fighting z-index
@starting-stylefor smooth entry animations using pure CSS- CSS Anchor Positioning as a progressive enhancement, letting modern browsers handle positioning natively while falling back to JavaScript for older browsers
- Touch device optimization - skip rendering the popover entirely on devices that can't hover
- Graceful degradation - if a screenshot doesn't exist, we just render a normal link
Thanks for reading! If you build something with this, I'd love to see it.
Here are some other articles you might find interesting.

A Modern Table of Contents in Next.js with CSS Anchor Positioning
In this tutorial, you'll learn how to build a floating table of contents component for your Next.js blog that tracks the reader's scroll position and highlights the active section with a smooth animated dot.
The Only Next.js Favicon Guide You'll Need (Updated 2025)
Learn how to properly add a Favicon to your Next.js application. No nonsense. No fluff.
Subscribe to my newsletter
A periodic update about my life, recent blog posts, how-tos, and discoveries.
NO SPAM. I never send spam. You can unsubscribe at any time!
