Mocking Components in Angular
Are you a front-end developer using Angular? If yes, you need to be writing unit tests to give you the confidence you need to know that your code is working as intended.
October 28, 2020 (6y ago)
6 min read
Are you a front-end developer using Angular? If yes, you need to be writing unit tests to give you the confidence you need to know that your code is working as intended.
This series of articles will cover concepts of unit testing, and show you how to test common operations in an Angular project.
In this first article, I hope to accomplish three things:
- Understand why testing in isolation is extremely important
- Understand how Angular resolves dependencies
- Understand how to mock components
Testing In Isolation
One of the things I've noticed throughout the years is that many developers fail to understand a key concept of unit testing: testing in isolation.
Testing in isolation sounds complex, but it's actually a simple concept.
Testing in isolation means that the unit that is being tested should be separate from other parts of the application.
What does this mean when we talk about unit testing in Angular?
Whatever you're testing (whether that be a component, service, pipe, etc) should have all other dependencies (units) separated/mocked.
If you don't test in isolation, you'll end up with hours of headache as you sift through ambiguous console errors trying to figure out why your tests are failing.
Still a bit confusing? Keep reading; I'll clear up a few things in a minute.
So, how does Angular handle dependencies?
Before we dive into mocking components, we need to understand how Angular resolves dependencies. Angular resolves dependencies through modules.
This is one of the best descriptive definitions I've found.
In Angular, a module is a mechanism to group components, directives, pipes and services that are related, in such a way that can be combined with other modules to create an application. An Angular application can be thought of as a puzzle where each piece (or each module) is needed to be able to see the full picture.
Open the app.module.ts file.
@NgModule({
  declarations: [AppComponent],
  imports: [BrowserModule],
  providers: [],
  bootstrap: [AppComponent],
})
export class AppModule {}
There are several properties in the NgModule, but let's cover some of the more important properties:
- The
declarationsarray is used to list out components, directives and pipes in your application. Whenever you generate a new component, directive or pipe using the Angular CLI, it will automatically be placed here. - The
importsarray is used to list out other modules in your application. - The
providersarray is used to list out services, but generally you won't edit the providers array in theapp.module.tsfile.
Try to remember what each array is responsible for - we'll come back to this shortly.
The Problem
When we generate a new project with the Angular CLI, the AppComponent is generated for us by default.
A new project also has some default tests as well. Running the tests produces the following results:
InfoI have 'ChromeHeadless' enabled in my
karma.config.jsfile.

It's nice to have a starting point, but you'll quickly find yourself generating new components and services.
Let's generate a new component with the Angular CLI called HeaderComponent which displays a navbar for our web application. Generating the component isn't enough for it to show up in your web application; we need to consume it so that it is rendered on the screen. In order to do that, let's say that we consume the HeaderComponent in the AppComponent.
// app.component.html

<div>
  <app-header></app-header>
</div>
...
Now, in order for the AppComponent to work correctly, it needs to render the HeaderComponent. Thus, we can say that the AppComponent is dependent upon the HeaderComponent.
From a testing-perspective, we now have a problem.
If we run the tests in our project using npm test, we'll see that we have some failing tests.
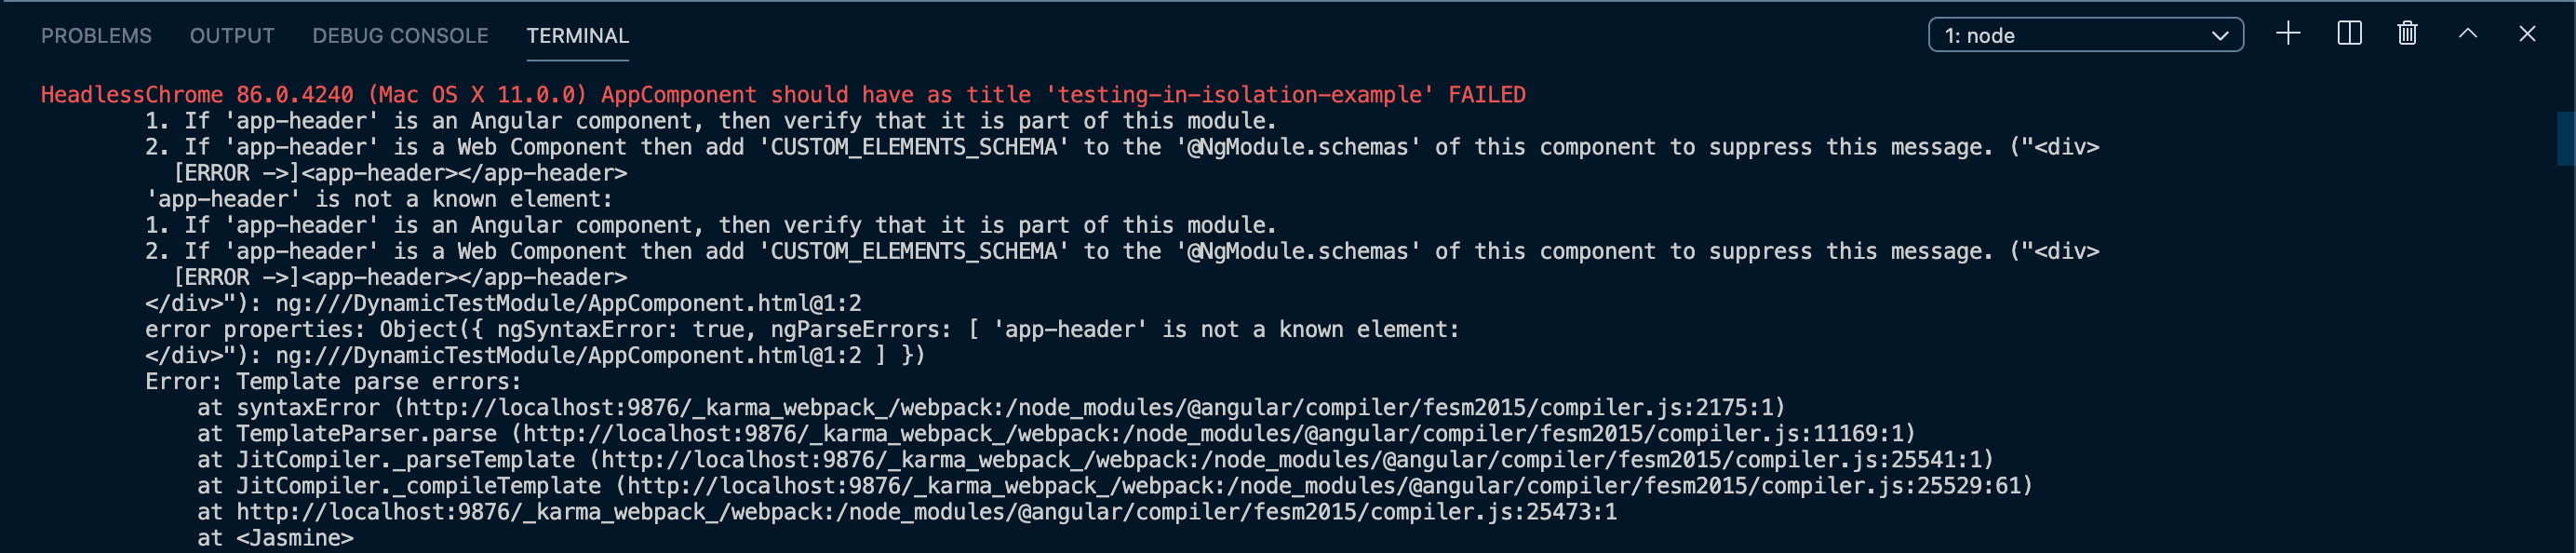
Why?
Looking at the output from the terminal gives us a clue.
The test file associated with the AppComponent assumes that we are testing in isolation; it only contains what it needs to run the tests for the component. Because we've introduced a new dependency (the HeaderComponent) in the template file of the component under test, the test environment is now complaining because it doesn't know anything about the HeaderComponent. Open the app.component.spec.ts file. Notice the following code and the lack of a definition for the HeaderComponent:
describe('AppComponent', () => {
  beforeEach(async(() => {
    TestBed.configureTestingModule({
      declarations: [
        AppComponent
      ],
    }).compileComponents();
  }));

....
}
When we generated the HeaderComponent with the Angular CLI, it automatically imported the component in the app.module.ts file under the 'declarations' array, but does not include the component in test files, as shown above.
Because the app.component.spec.ts file doesn't have the HeaderComponent listed in the declarations array, it doesn't know how to satisfy that dependency.
The Wrong 'Solution'
Now that you understand why the test is failing, your first instinct may be to import the HeaderComponent and include it in the declarations array like this:
beforeEach(async(() => {
  TestBed.configureTestingModule({
    declarations: [AppComponent, HeaderComponent],
  }).compileComponents();
}));
Doing this and running the test makes all the tests pass.

All good, right?
Well, not really.
By bringing in the HeaderComponent, the test environment is now using the real HeaderComponent. This breaks the law of testing in isolation. If the HeaderComponent had other components inside of it, or had a service injected in it, all of those dependencies are now showing up and being used in our test file for the AppComponent. No bueno.
How do we solve this issue?
Let's take a look.
The Real Solution - Mocking
Instead of using the real HeaderComponent, we can create a fake class, also called a mock, that looks like the HeaderComponent and then provide it to our testing environment. This makes the test environment happy, and allows us to define the shape of the component without all of the other dependencies and/or encapsulated logic. This makes testing super simple.
So, how do we mock out a component?
It's very simple.
At the top of our test file, use a @Component decorator and define a new mock component class.
@Component({
  selector: "app-header",
  template: "",
})
class MockHeaderComponent {}
Notice a few things:
- The
selectorproperty has a value that matches the selector of the realHeaderComponent. This must match the realHeaderComponentselector and is how the test environment satisfies the dependency. - The template property is required, but can be left as an empty string.
Now that we've defined the mock component, head back to the TestBed.configureTestingModule and include the MockHeaderComponent class in the declarations array.
TestBed.configureTestingModule({
  declarations: [AppComponent, MockHeaderComponent],
}).compileComponents();
Now if we run our tests, everything still passes. The difference is that the AppComponent is now using the mock class instead of the real HeaderComponent in the tests.
Great job!
Final Thoughts
Now that you know how to mock components in Angular, you've tackled one of the most common headaches that developers face when unit testing.
In a real enterprise application, I'd move all of my component mocks into their own directory in the project so that each test file can import the mock component it needs.
I hope this article has been helpful and has helped demystify what it means to test in isolation, and how to actually mock out components in Angular.
In the next part of this series, I'll show you how to mock out services - make sure to subscribe to my newsletter so you don't miss it!
Thanks for reading! If you liked this article and want more content like this, read some of my other articles and make sure to follow me on Twitter!
Here are some other articles you might find interesting.

Effective Use of beforeEach and afterEach in Angular Unit Tests
Let’s discuss the importance and common use cases for the beforeEach and afterEach lifecycle methods in Angular unit tests, including mocking out external services, resetting the application state, and setting up test data.

Mocking Services in Angular
In part two of this series, I want to continue the discussion of testing in isolation and briefly turn our attention to services.

Subscribe to my newsletter
A periodic update about my life, recent blog posts, how-tos, and discoveries.
NO SPAM. I never send spam. You can unsubscribe at any time!
